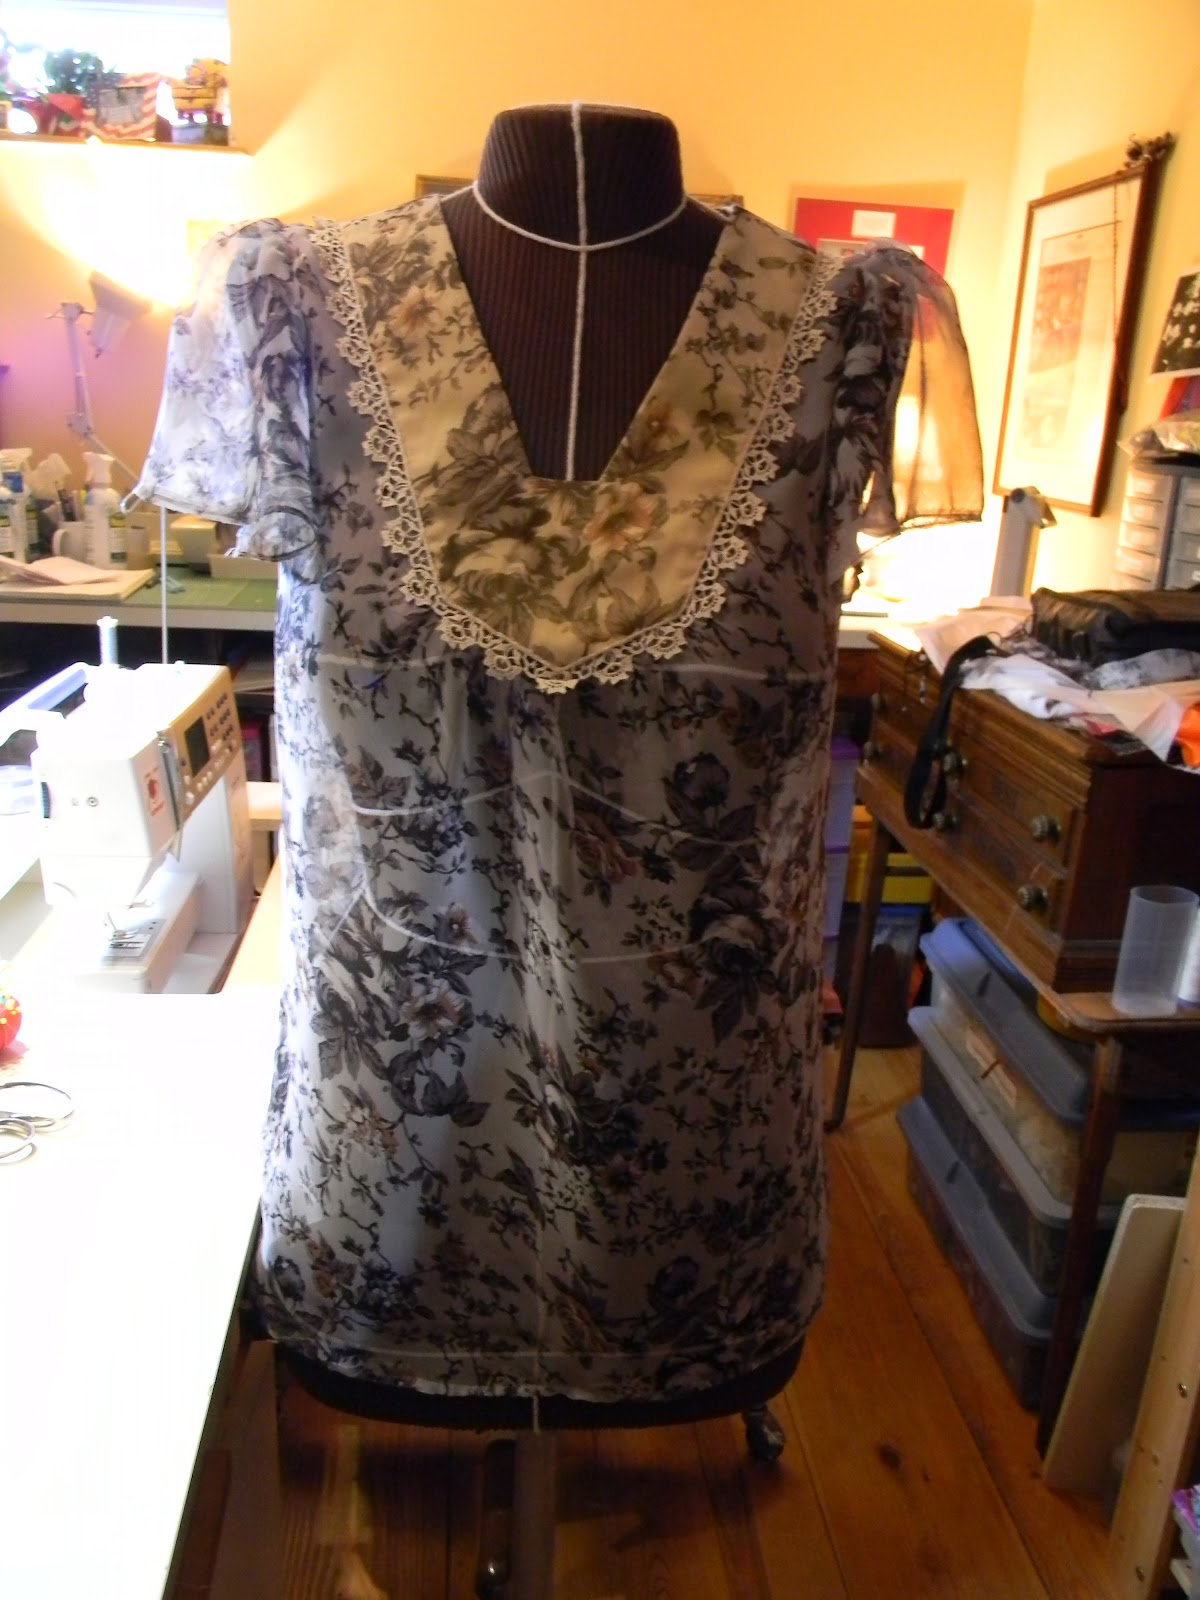
Wait, this time the pattern actually is very simple to construct and has excellent instructions. It is Simplicity 2891 and I made version C without trim on the sleeves. Unfortunately, this particular pattern may be out of print now, but I'm sure there is something similar in the pattern books since the bohemian look is a popular style.
This is the chiffon my daughter selected. It works well as an overlay for the yoke, but it is like taming butterfly wings to sew without support. The fabric description is very lightweight, but it should have read very, very, very lightweight.
Even though I tried starching the fabric, it shifted as I was rotary cutting. My advice: if you need to work with chiffon, don't rush through your sewing, you need to take your time. Using a dab of fabric glue stick in difficult to pin areas will help stabilize the sewing area. Silk thread works wonderful with chiffon.
I had to coat my hands with Paul Mitchell hair gel in order for them not to snag the fabric as I was sewing. They're not chapped either since our winter has been so mild.
I added some vintage trim around the front of the bodice; so much nicer than a newer trim. This trim came from an estate sale box that had the most amazing chemical lace and tatted edging. This blouse would seem a bit dull without this beautiful trim to give it an aged ambiance.
I had to hand roll the hems. Here are the steps I used:
1) Sew a 1/4" seam line along the fabric edge to be hemmed.
2) Pink the seam allowance to 1/8".
3) With a cool iron, press the hem up along the seam line.
4) Sew a narrow seam along the fold.
5) With your fingers, gently roll the hem up as you are sewing a slip stitch. Step 4 gives your needle a channel to hide and hold the thread.
6) Gently press the hem with a cool iron.
I am going to put the dress form away and get back to quilting now! (Well, after I clean up my sewing room!)
Showing posts with label chiffon blouse. Show all posts
Tuesday, March 13, 2012
Thursday, March 1, 2012
When Patterns Claim They Are Easy Part II
I'm finishing up the chiffon blouse and I have two more suggestions for working with sheer fabrics.
Make friends with your iron.
Pressing after each step will ensure a nice crisp look and help tame your fabric.
Pressing your garment; the difference between handmade and homemade.
I have a preference for sewing in interfacing rather than using fusible brands. I found that if you use just a bit of fabric glue to hold the interfacing to the fabric, it will stabilize the layers making basting easier than using pins. My preference for fabric glue is produced by Sewline. It is not a permanent glue and will dissolve in the wash.
I trim my interfacing as close as I can get to my basting stitches. Especially important to remember with sheer fabrics is the interfacing should go on the outside facings; trimmed seams will only be seen from the inside.
Here's the finished blouse. Black fabric is really tough to photograph, but the good news, it can really hide any imperfections.
Okay, now my rant.
Here's a portion of the pattern instructions. They are too vague for a beginner and more illustrations of the steps are needed. Gone are the days when schools offer sewing in Home Economic classes to give young students a basic sewing knowledge to tackle a pattern labeled "easy". Also, gone are family members who can offer assistance because they have a knowledge of textiles and sewing techniques.
The cost of the pattern, fabric, notions and thread is expensive! I would hate to see a young sewer invest in a project only to become frustrated and hide it in the back of the closet. Sewing isn't suppose to be a chore, it is the opportunity to create clothing reflecting your personality and setting your look apart from what is available with mass produced goods.
Maybe a solution would be for these small independent companies to have some sewing tutorials on their websites. Or even notations in their patterns where they could have the steps outlined in more details. Or better yet, they could label their patterns to actually reflect the skill level needed and write better instructions.
Pattern companies take note, make your patterns to the best of your abilities to ensure a new generation of sewers.
Make friends with your iron.
Pressing after each step will ensure a nice crisp look and help tame your fabric.
Pressing your garment; the difference between handmade and homemade.
I have a preference for sewing in interfacing rather than using fusible brands. I found that if you use just a bit of fabric glue to hold the interfacing to the fabric, it will stabilize the layers making basting easier than using pins. My preference for fabric glue is produced by Sewline. It is not a permanent glue and will dissolve in the wash.
I trim my interfacing as close as I can get to my basting stitches. Especially important to remember with sheer fabrics is the interfacing should go on the outside facings; trimmed seams will only be seen from the inside.
| This is the collar visible from the outside. The interfacing hides the seam allowances. |
Okay, now my rant.
Here's a portion of the pattern instructions. They are too vague for a beginner and more illustrations of the steps are needed. Gone are the days when schools offer sewing in Home Economic classes to give young students a basic sewing knowledge to tackle a pattern labeled "easy". Also, gone are family members who can offer assistance because they have a knowledge of textiles and sewing techniques.
The cost of the pattern, fabric, notions and thread is expensive! I would hate to see a young sewer invest in a project only to become frustrated and hide it in the back of the closet. Sewing isn't suppose to be a chore, it is the opportunity to create clothing reflecting your personality and setting your look apart from what is available with mass produced goods.
Maybe a solution would be for these small independent companies to have some sewing tutorials on their websites. Or even notations in their patterns where they could have the steps outlined in more details. Or better yet, they could label their patterns to actually reflect the skill level needed and write better instructions.
Pattern companies take note, make your patterns to the best of your abilities to ensure a new generation of sewers.
Wednesday, February 29, 2012
When Patterns Claim They Are Easy....
Exactly what is an easy pattern? Easy to sew because the instructions are well written? Easy to sew because you have some experience and are aware of the unwritten steps?
This is an absolutely adorable pattern designed for sheer fabrics such as voile, chiffon and georgette. The fabric selected is a black chiffon print which also has a secondary design of a stripe.
Here is a section of the instructions.
Easy, sure, if you have had some sewing experience. It is such a great design that I thought I would blog about some ideas to help if you're tempted to sew a pattern in a sheer fabric, or even this pattern .
If the fabric you're going to be sewing is washable, give it a heavy dose of spray starch or sizing. This is great for taming the fabric making it crisper to handle when laying out your pattern. How much starch.... I really give it a nice heavy dose. Your garment can always be washed when you're finished sewing, so don't worry about going overboard.
Lay out your pattern on a cutting mat and use a rotary cutter rather than scissors to cut out your pattern. Since the layers of fabric are sheer they have a tendency to shift when using shears.
When the pattern calls for gathering .... make two rows of basting stitches, one row at 5/8" and another at 1/4". The second row of basting controls the fabric in the seam allowance.
The bodice front and blouse back are sewn to the yoke using an envelope method. The bodice front and backs are rolled up and tucked inside the yoke while the seams are sewn. This allows for the seams to be enclosed . While it is an easy technique, the fabrics rolled up are difficult to keep in place while trying to sew the seams. This problem is solved by rolling up the sections and then pinning with safety pins.
This looks strange, but the results are quite nice:
Even though the sleeve is a smooth set in, the sleeve needs a row of basting stitches. I sewed a 1/2" seam with basting stitches on the sleeve cap. I pulled the basting stitches slightly my 1/4" seam for the french seam would be smooth. I trimmed the seam with pinking shears, turned it to the inside for my 3/8" seam.
You can see the basting stitches still in the sleeve fabric. If you need to clip the basting stitches to relax the sleeve fabric, go ahead and clip away (but just clip the basting stitch, not your fabric).
Just the extra step of the basting stitches makes a great set in sleeve - nice and smooth!
Almost finished....... finishing touches tomorrow!
This is an absolutely adorable pattern designed for sheer fabrics such as voile, chiffon and georgette. The fabric selected is a black chiffon print which also has a secondary design of a stripe.
Here is a section of the instructions.
Easy, sure, if you have had some sewing experience. It is such a great design that I thought I would blog about some ideas to help if you're tempted to sew a pattern in a sheer fabric, or even this pattern .
If the fabric you're going to be sewing is washable, give it a heavy dose of spray starch or sizing. This is great for taming the fabric making it crisper to handle when laying out your pattern. How much starch.... I really give it a nice heavy dose. Your garment can always be washed when you're finished sewing, so don't worry about going overboard.
Lay out your pattern on a cutting mat and use a rotary cutter rather than scissors to cut out your pattern. Since the layers of fabric are sheer they have a tendency to shift when using shears.
When the pattern calls for gathering .... make two rows of basting stitches, one row at 5/8" and another at 1/4". The second row of basting controls the fabric in the seam allowance.
The bodice front and blouse back are sewn to the yoke using an envelope method. The bodice front and backs are rolled up and tucked inside the yoke while the seams are sewn. This allows for the seams to be enclosed . While it is an easy technique, the fabrics rolled up are difficult to keep in place while trying to sew the seams. This problem is solved by rolling up the sections and then pinning with safety pins.
This looks strange, but the results are quite nice:
Even though the sleeve is a smooth set in, the sleeve needs a row of basting stitches. I sewed a 1/2" seam with basting stitches on the sleeve cap. I pulled the basting stitches slightly my 1/4" seam for the french seam would be smooth. I trimmed the seam with pinking shears, turned it to the inside for my 3/8" seam.
You can see the basting stitches still in the sleeve fabric. If you need to clip the basting stitches to relax the sleeve fabric, go ahead and clip away (but just clip the basting stitch, not your fabric).
Just the extra step of the basting stitches makes a great set in sleeve - nice and smooth!
Almost finished....... finishing touches tomorrow!
Subscribe to:
Posts (Atom)