Wednesday, October 31, 2012

How to make a mitered hem - tutorial

*The tutorial for the mitered hem can be used with napkins, tablecloths, or on any project where you want your hem to look great on the corner.*


Today I made the crib skirt for the pink and grey nursery set and I thought I would pass on a few steps often not included in commercial patterns.  The first is to miter your hem corners on the skirt sides rather than just turning in the side and bottom hem allowances and hemming. 

A mitered hem makes the edges crisp and gives a professional look.  The secret is the bulk is trimmed away allowing the corner to be smooth and hang straight.

In these directions I am using a total of a 1 1/2" hem on the sides and bottom of each skirt side.  Press under 1/2" and then an additional 1" hem on each side you are hemming.  At each corner, open  the hem allowances.  Fold the right sides of the fabric together to form the following triangle:

You will be sewing a 90 degree angle from the point were you turned under your 1" hem to the 1/2" hem point.  Sew a seam between these two points.
Once you've sewn your seam, trim the seam allowance to 1/4" and cut the point at an angle.
Finger press the seam allowance open.
Turn right side out with the 1/2" seam allowance on the edge turned under.  I'm using a metal Dritz hem gauge with my steam iron  to get a crisp edge when pressing.
To sew down the hem, I used my blindstitch foot with my needle to the left.
This is the inside of the mitered corner.  Sure is nice not to have bulky crooked corners!  The blindstitch foot does a great job.
Once the side panels are attacked to the main piece, I serge or finish off the seam.  Then I press the seam towards the body of the skirt base.

The next trick is I get out my blindstitch foot again and use it to put a row of stay stitching along the seam.  Stay stitching is just important in home dec sewing as it is in sewing apparel.  Just like you don't want your facing to flip up at your neckline, you don't want the seam flipping around when the skirt is washed.
Just a few extra seams will give professional results to your project.

Wednesday, October 24, 2012

Make your own crib sheets tutorial...

Each sheet takes a little over an hour of time, but you'll love how these sheets hold up to washings compared to commercially produced nursery sheets.  Plus, you have the advantage of selecting fabric to match the decor you want for the room.

Each sheet will take 2 yards of cotton fabric measuring at least 44" wide.  Wash the fabric in hot water and dry on hot.  Shrink it now and not later!!  This is very important and it took a few sheets before I learned my lesson.

Now cut your washed fabric to 43" wide by 66 1/2" in length.

From each corner, cut out a 6 1/2" square.  This is for a mitered corner.
Serge or zigzag any raw edges.
At each corner bring together the right sides of the fabric (where you cut out the 6 1/2" square) and sew a 1/2" seam. 
Serge or finish off this seams at each corner.
Press the seams to one side and stitch the seam allowances down.  This reinforces the mitered corners for when monkeys are jumping on the bed.

Press a 1/2" hem around the entire edge of the crib sheet.
At each corner you'll make a casing for elastic to be inserted.  I use 12" total at each end.  
Stitch down the seam allowance.
Cut a 6 1/2" piece of elastic for each corner.  Put a safety pin at one end and thread the elastic through the casing.
At each end of the casing, stitch the elastic securely in place with your sewing machine.  Remove the safety pin.
Each corner should look like this.
After completing each corner, finish off each side by stitching down the 1/2" pressed hem allownace.
Finished! 
Looks like I finished this one just in time because UPS just brought the rest of the fabric for me to finish off the quilt.

For the pink and grey nursery.
P.S.  For a Pack and Play sheet:  Wash and dry a 1 1/4 yard piece of fabric.  Cut a 41" square from your fabric.  Cut out a 2" square from each corner.  Use 1/2" seam allowances and follow the directions for sewing the crib sheet.  Have fun sewing!

Monday, October 22, 2012

Pink and Grey in the Nursery

I'm currently working on a nursery set for family friends.  Spencer and Jordana are expecting a little girl in January and they have decided on a pink and grey color scheme. 

I love the look of this sweet and contemporary palette, but maybe I love it so much because it has a touch of vintage.

This past summer I purchased an embroidered nursery quilt top I thought would be a fun hand quilting project for snowy, cold, winter nights.  This design is the Bedtime Quilt or the Quaddie Quiltie series by Rubie McKim in 1916 for the Kansas City Star. 

The top measures 61" x 50" and has 20 different embroidered characters.  It is in great condition with no staining, holes or condition issues for its age.  A simple quilting pattern will bring it to life.

A very wise owl.


Jump forward a few decades.

I picked up this embroidered and painted pillow cover at an estate sale hidden in a box lot.  This has the Voguart stamp on the inside selvage; Voguart was a combination of  embroidery and painting.  In this pillow top the grey spots and pink backgrounds were painted.  I'm thinking this might be a cute design for applique.  Who doesn't love a puppy?

Sorry, but just an opportunity for Indiana to say Hi!

So back to a current pink and grey palette with the start of the baby quilt.  A simple 6 inch nine patch block is dynamic with the limited colors.

The finished quilt will be 36" by 48" - 48 blocks.  Some of the prints have a touch of red and blue to give it a little spark.  
More developments later as I want to share my crib sheet directions.  For the nursery I'm doing sheets to coordinate with the quilt and crib skirt.  Tutorial to follow this week!


Monday, October 8, 2012

I've gotten soft....

Included in a bundle of vintage patterns at a sale this past week was this needlework magazine.  At first glance I thought I would just take it out of the bundle and leave it at the sale for some needlework enthusiast, but then the date caught my eye and it went home with me.
This was Volume 1 (1975) of McCalls Needlework & Crafts.  Oh wait, THE BEST of McCall's Needlework & Crafts. They're listing quilting!  This was just prior to the bi-centennial and the resurgence of quilting.  I can't imagine the gorgeous quilt they're capturing for viewers to get excited about bringing quilting back into the mainstream of needlework.


Here we go, page 120; "An Album Quilt, Rich in Design".

No provenance or date, but I questimate the turn of the century with some older pieced blocks added.  The pink and white stripe chambray as well as some conversation prints are what I am looking at to determine its possible age.  These fabrics look about the newest in the mix. 

The caption reads: "Although the quilt blocks vary in size, they are pieced with borders where necessary to make a quilt 71 x 88."  

And on the opposite page, the directions.  Wait, before you look at them, think about the pages of directions this scrappy, diverse and unconventional pattern would take to instruct the quilter of today - pages - maybe even a booklet!   Drum Roll.  Ready, because all the patterns are on ONE PAGE:


Here, let me enlarge a section for you.  Notice the fly foot pattern at the bottom left corner. 
Goodness, we have gotten soft as needle-workers.  I don't know of many quilters today who still use templates; Martha is the only person I can think of right now (and her creations are so magnificent that arguing against using templates would be futile bordering on ridiculous).  This pattern was before the rotary cutter became a staple in the sewing room.  Templates were made of the pattern pieces and then the quilter would carefully trace the template on the wrong side of the fabric and use their pencil line as the seam line.  Preparation of templates and fabric were additional steps adding to the time required to create a block.

I learned to quilt with templates and I was more than happy to switch to a rotary cutter. 

I have gotten soft.  Yes, as a quilter and as an individual!  I'll show you why.

Remember I have a very special wedding coming up this weekend...   here I am reattaching lace to an underlining I hemmed on the wedding dress....  I'd show more, but my daughter wouldn't be too happy with me if I did just yet.

I have procrastinated like never before in getting my own dress made.  I can't figure why the delay, but maybe it might have had to do with my fluffy factor.

I found a great pattern, McCalls M6464.  I thought it was perfect; no frills yet simple and dressy.  Do you notice the alterations look like more tissue paper added than the original pattern?  Wow, fluffy is right!!  The pattern, in its defense, wasn't the problem as it was extremely easy to alter.      

Here it is with pins through the lining and hem and waiting to get steam pressed when finished. The cranberry shantung sateen was purchased from Fabric.com.  I think it will work out great for a fall outdoor wedding at an arboretum!  I used the satin side for the bodice and the shantung side for the skirt.


My dress cost less than $30 (pattern, fabric, thread and invisible zipper) to make buying the pattern and zipper on sale.  Fabric.com always has great deals on their fabrics.  That's definitely not fluffy though!

Wednesday, September 26, 2012

Catching Up: Pumpkins and Pennants

I've been back in the kitchen cooking.  This is what happens when there is a chill in the air!  We're in need of some comfort food.  

Apples were a bust this year with the early warm temperatures bringing out the blossoms only to get clobbered by several hard frosts.  To compensate for the lack of apples, I am diverting my attention to pumpkins.  Here is the best recipe for a pumpkin bread.  It is a yeast bread that is super easy and the texture is wonderful. There are raisins and ginger in the dough.  The ginger is a wonderful compliment to the pumpkin flavor.

Be sure to plump your raisins before you add them to your dough.  You can do this by taking your raisins and placing them in a bowl with a few tablespoons of water.  Cover and microwave for two minutes on high.  Let them cool before adding to your dough.  If you add dry raisins to your dough they will absorb the moisture from your bread and make it dry.   I brushed the top of my braids with butter and then sprinkled raw sugar to the top before baking.    

My husband is not fond of pumpkin and he thinks this bread is delicious.  Thank you again King Arthur Flour for having the best recipes and products!

Next month is my daughter's wedding.  I got an email from her the other day announcing she had forgotten all about decorating the outside area of the arboretum where the wedding ceremony will take place.  Could I make some wedding banners to block off the chairs from the center isle?

Let see, I've been collecting lace, hankies and tatting for over a year now, I'm sure I have something in my sewing room.

Some wonderful NOS hankies.  Also, some great embroidered organdy from the 1950's.

This is some vintage bias tape with the right patina to go with the vintage lace.  If you ever get discouraged going to the grocery store to find the one pound bag of coffee (16 ounces) is no longer 12 ounces, but now 10 ounces, realize this sales merchandizing of providing less product for more money has been going on since Capitalism was invented.  Notice the bias tape package went from 10 yards to 8 yards.  I bet those home sewers were upset!!!
One of the doilies I cut up looks like a heart. 


So off to the sewing room.  Three banners made, three to go.......

Sunday, September 16, 2012

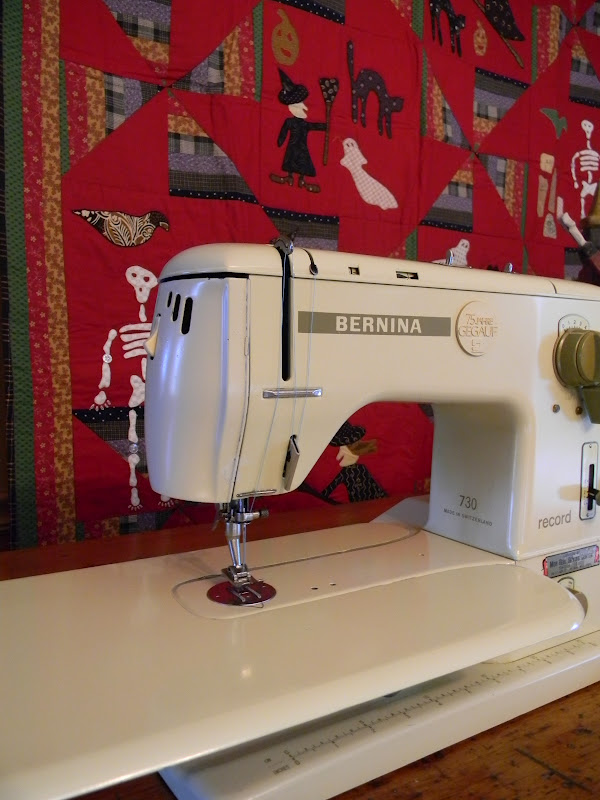
A picture is worth a thousand words..... New Machine in the House

A Bernina 730 Record Sewing Machine.

I guess a picture should be enough, but since I'm entitled to a thousands words, I'll see what else I could say about this sewing machine I just purchased.

I got my first Bernina in 1983.  My husband took me to the local sewing center along with three children so I could pick out my Mother's Day present.  My Kenmore at the time had terrible thread tension and made sewing quite frustrating.  My husband, along with my three little tykes by his side, stood guard by the $99 Singer the store was advertising.  I went home with the Bernina 930 at the other end of the $$$ spectrum as well as being located at the other end of the store.

I had sewn on a Bernina when I had taken a clothing construction class in college and I found it to be an amazing machine.  It was a thrill to finally be able to take one home.

In 1993, ten years of sewing later and one additional tyke in the family, I replaced my 930 with a 1230.  I sold my 930 machine to a quilting friend and as far as I know she is still sewing strong on it.

It is easy to spot a good machine.  All you really have to do is plug it in and listen to the motor.  Then, check the different functions and how easily the components move - is any gear locked in place?  This 730 passed the test with flying colors.  It had its original table and pressure foot knee lift along with the manual and all the additional feet.  (Don't you wish new machines came with the feet selection the older machines had!  Those feet are expensive!)  It didn't have its case or the swing out accessories holder in the back, but those items were minor compared to the great shape and stitch quality of the machine.

This particular machine had its original warranty card and was purchased in December of 1969.  

Over the years I had several additional Berninas pass through my hands - an 830 I found for a friend and an 801 Sport I gave to my daughter.  Currently I sew with my 1230 and a 440QE.  I still prefer my 1230 over the 440. 

This was  the second machine I purchased within the last three weeks.  The other machine  was a Singer 201 and it went out the door to a friend within a few days.  It was serendipitous to find a machine that my friend was looking for as she had sewn with this Singer model as a child.

I like to think that I have been lucky finding sewing machines, but now I'm wondering if they are finding me.


Saturday, September 1, 2012

Bundle of clothes to wrapping a bundle...

Yesterday I finished up a baby quilt made from clothing.  I had a blue Ann Taylor wool sweater, a pair of pink velour pj's and several printed bandanas.

Two sisters wanted their other sister, who is expecting a baby girl, to have a baby quilt made from their Mom's clothing.  She had passed away five years prior to cancer.  The quilt wasn't suppose to remind them of their Mom's final journey, but rather be a joyful quilt.

Tulips were her favorite flower.  She had handwritten a note to her girls that I could include.

The binding is a solid magenta and the backing is the same cream color as in the top.

The first thing I did was take the sweater and wash it up in the hottest, soapiest water - felting the fabric so it wouldn't shrink later when the quilt was washed.  Then I carefully pressed lightweight interfacing to the wool and velour.  If you've ever sewn with a knit, you'll understand the stretching that takes place if it isn't stabilized.  Then I cut the pieces I needed from these fabrics.

I made sure with the design that the wool and velour was always sewn next to a cotton and not next to each other.  The reason is so I always had a very stable fabric next to the knit piece.

I ended up melting a few of my velour sqaures - I am too accustomed to using a hot iron for pressing as I'm piecing my blocks together.  So using a pressing cloth was important as well as turning down my iron heat setting to low

The blocks are 8" square finished and the border is 4" with the quilt ending up 40" x 48".  Using the wool and velour, although a bit challenging to machine quilt, makes a great textural surface giving more depth to the quilt.

I like to think that this woman is able to loving wrap her arms around the new bundle even though she isn't physically here to do so.  

Cancer has touched the lives of so many individuals I have never met, yet we are now connected through needle and thread.