Friday, March 30, 2012

Did I ever tell you about the time........

......when my youngest daughter decided my pressing ham was a blank canvas for her artistic creations?  Maybe she got this notion from her older sister?   Here's the story and I am telling this from the perspective of the adult:

In the 1980's Amish doll quilts and dolls were very popular and I purchased a pattern and made the set.  Now for those of you not versed on these dolls, they have no facial features or hair.    The Amish custom is possibly linked to the second commandment (Exodus 20:4-6) in regards to not having images, likenesses, or idols.  Just like the pattern I made this doll with a black bonnet and a solid blue dress.

The first thing my daughter did when she saw the doll was take it and draw a  face in crayon on the head.  I found it later in her closet.  I was not a student of children's cognitive development and their ability to understand the concept of reflections of themselves, mirrors, Amish traditions, etc.   My daughter was more eloquent in her explanation and rationalization of dolls having faces because people have faces. 

Fast forward 10 or so years and my youngest daughter is in my sewing room keeping occupied quite nicely......................until I needed to do some ironing and noticed my pressing ham.  I look back in retrospect and I am not proud of myself when I had a bit of a meltdown about the ink marks and how I might never be able to use the ham again.......   but there it was in all its glory smiling at me.  It was the Amish doll incident all over again!! 

And now, you might ask why I would bother to tell you about this little snippet of the past.  Well, it is a fact that to this day, I am never without my friend in my sewing room.  This little face has brought me more pleasure over the years because it reminds me of my kids.  I'll share my ham with you now:


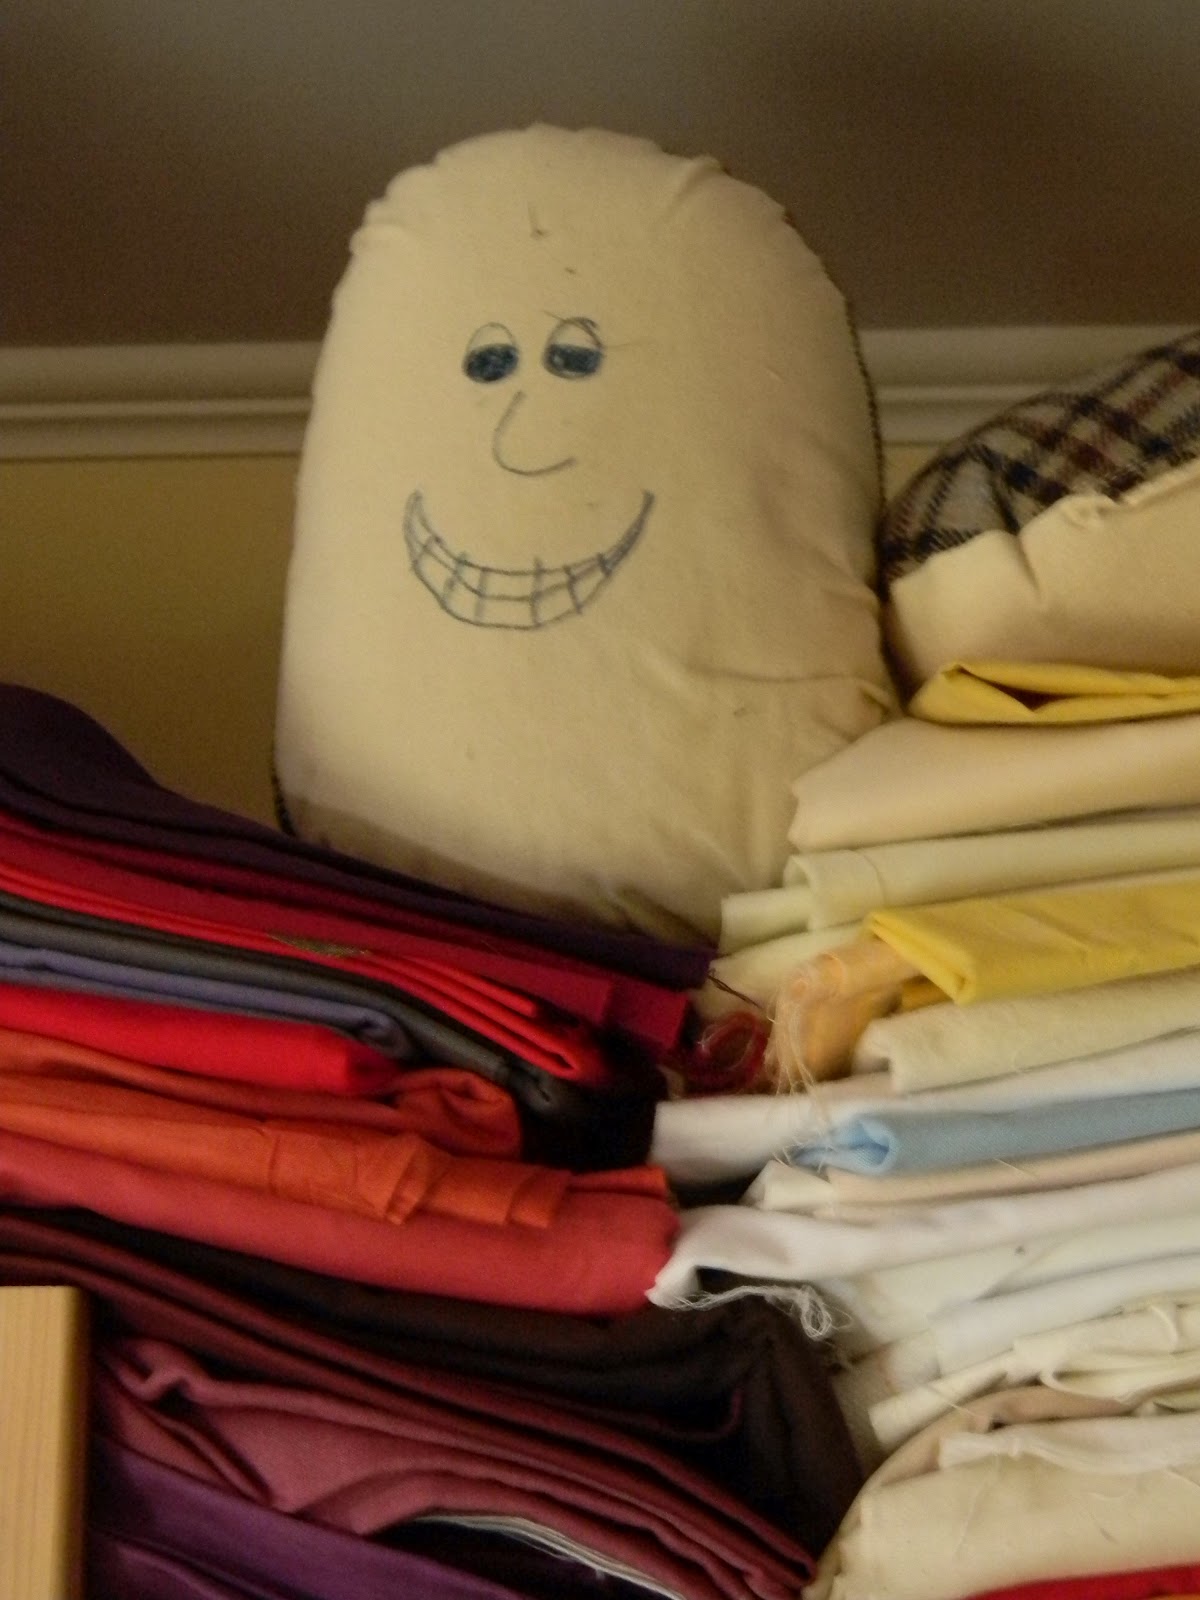
How can one not smile at such an infectious grin from this character?  What a ham!!

Tuesday, March 27, 2012

Turn of the Century Strip Quilt Top

You can get the idea of how a border design was created with rows of triangles and then a final row of squares going around the quilt's parameter.  The rows of triangles at the bottom don't create the wonderful zigzag pattern found on the sides. 


Bottom right corner.  Alternating the placement of the prints in the side borders creates the wonderful zigzag design.


The pink and yellow plaid on the black background is not a woven fabric, but a bright neon novelty print of the 1890's.


A few bars were exclusively light colored shirting and light color prints.  The light/dark sequence was eliminated.


I was thinking about the direction of quilt making today and I thought about the majority of new patterns coming out on the market or in magazines utilizing large geometric shapes that are easy to piece together.  Let's not forget that I just did a Sticks and Bricks for my daughter for her wedding which was just rows of different size rectangles pieced together. Certainly there are intricate patterns currently being painstakingly created by the many talented quilt artists across the globe.... but then there are just these simple quilts the designers or magazines will categorize as simple or beginner quilts - easy patterns using quick strip piecing techniques to make it even faster to assemble.

When I first think of 19th century quilts, I visualize intricate patterns pieced together or time consuming applique.  But, then, there is this category of bar or strip quilts which is the easy or simple pattern of the era -  sometimes referred to as utility quilts.  Random patterns assembled in order to create a usable household object.

The bars in this top are all hand pieced and the bars added to the long fabric border strips are machine pieced.  Maybe these strips were left-overs from another quilt project that got too large?  Maybe hand piecing the strips was an enjoyable activity, but adding the long strips was just the right kind of task for the sewing machine?

The end result is a very primitive quilt with a masculine feel.  Now this is what I would call a farmhouse primitive; just the kind of quilt made for the farm hand for his bunk.

Sunday, March 25, 2012

Flying Geese and Four Patch - Vintage Blocks and New Quilt

In the 1980's and 1990's vintage patchwork made their way into household decorations.  Recently I purchased a box of vintage blocks where this type of quilt recycling had been taking place as the quilt blocks were cut into the shapes of pigs and cats.  I'm guessing they might have been for Christmas ornaments for a tree since primitive items were extremely popular.  The strips of flying geese had been salvaged from a quilt that may have out lived its usefulness.  The sides of the blocks show the thread remnants from carefully removing it from the quilt.

The four patches in the box had never been put into a quilt, however, they had been washed as the edges were a bit frayed from the activity.

I decided I wanted to combine the sets of blocks and give them a new life by putting them into a wall hanging.  The strips of quilt blocks work well creating a strippy quilt design or bar pattern popular in the 19th century.

Many  of the strips of flying geese blocks would be perfectly straight and then suddenly a curve would start veering to the right or left.  How were these ever put into a quilt?  I would think there were either some major puckers and gathers OR, this quilt never hung straight.  None of the geese measured the same size.

While none of the flying geese were a uniform size, I was able to work three strips of them into the quilt.

The flying geese strips were older than the four patch blocks.  Here you can see a geese of early purple dye, possibly Perkins Purple.

I machine quilted it in diagonal cross hatching.  This would have been a quilt design used by quilt makers machine quilting their quilts at the turn of the century.


Here it is finished.  It measures 23 21/2" x 33".  I believe the blocks now have a new life and can bring a little piece of history into someone's home.

Friday, March 23, 2012

Graham's Magazine 1840

There is a passing cloud, a hint of rain and its in the mid '60's.  I had to find an indoor activity for the day, and I am saying this is my most facetious tone.  But I did retreat indoors after a walk at the park.  My husband is a lover of anything/everything Edgar A. Poe, so I took to looking through one of his "Mr. Eddie" books, Graham's Magazine 1840.   And, when I mean looking, I mean enjoying the illustrations rather than the literary contributions of the day (as Poe was a contributor to the magazine that year).
I have the feeling they are captivated by their tulips and peonies just as we are today.  However, I am guessing these varieties which we would consider heirlooms today,  have a fragrance surpassing today's varieties.

A colored plate of their high fashion of the day.  Quite subtle colors except for those brilliant red flashes.  I was just thinking of the amount of soutache or braid purchased as trim and the additional sewing time.  Although the sewing machine was invented by 1840, it was not a household item. Definitely additional sewing time for these fashions.


The latest in fashion for spring or summer attire.

"My Brothers"  The checked frocks with ruffles and bows at the sleeves are quite adorable.  Yes, adorable.  Guess if the little one perched on the stool is a brother, or a sister?  I'm not sure the bonnet is a give-away for either gender at this point.  It would have been nice if this was a color-plate to see the colors selected to go with the fashions.  This was the illustration for the poem "My Bothers" written by Mary L. Lawson.  So, yes, the little one on the stool is a girl.

"Coming to Get Married"   The ladies look with gleeful glances as the pastor seems perturbed; maybe he burnt his tongue on the hot tea just seconds before the entrance of the lovely couple?  It had to be some physical pain to give him such a miserable appearance on such a glorious occasion. 


Ephemeral objects which have survived 170 years are just treasures at this point.  I can only imagine where some of the other color plates went over the years and if they were put on display at the time to be admired by their owners.

And thinking of paper objects reminded me of something I have never really seen after years of selling vintage wooden spools - paper advertising tucked inside the thread wound on the spool.  The paper caught my attention and then I pondered as to whether I should unwind it to reveal this ephemeral advertising piece.

 After a second of deliberation, I started to unwind the thread....

and it quickly fell out with rows of thread left in tack on the spool...


Just the sweet little kitten motif made it fun to see.  I wonder if the offer for the Dressmaker's Sample Card is still available?  Maybe the hunt is on to see if this treasure is still somewhere to be found!

Thursday, March 22, 2012

Another Day Like No Other Spring Day

It is as though we've never seen a daffodil bloom as we look at the gardens in amazement.

We've never had a spring this early or so brilliant as this day.

Blossoms we are lucky to see for May Day are warming in the sun.

Even some garlic that I threw into a deck planter has emerged.  Yes!

The bleeding heart won't be left behind.  I never removed any mulch; no time to do it!
So it is a spring day like no other!  I would remember whether or not a particular anniversary was as beautiful as this and I can say with authority.....no.  We may have had a sunny sky, but always chilly or just plain snowy.  To celebrate this year I made a cake to feel like spring; the  King Arthur Flour Tender White Cake.  I filled it with liquid sunshine, or what is known as a one 10 oz. jar of Dickinson's Lemon Curd.  Then I frosted it with fresh whipped cream.  Happy Anniversary to the love bugs!  :)

Tuesday, March 20, 2012

Yes, Pierogies Are Very Easy to Make

There is a reason almost every ethnic group has a filled pocket dough recipe; it is inexpensive to make.  Growing up, who didn't have some flour, eggs, potatoes, onions and cheese in the pantry?  These staples were around even when the shelves seemed a little bare at the end of the month.

I have been going through my Mother-in-law's recipe box and word processing her favorite recipes for my children.  My MIL had four different pierogi recipes!  I used the clean card, brown card method for determining her recipe's value.  Clean card meant she never used the recipe.  Brown card meant it was held, used, filed, used, etc. with additions of a little flour or oil on some occasions.  My MIL had several recipes from her Mom and other relatives and parishioners at St. Peter and Paul Ukrainian Church.  But while I wrote these out for my kids, I'm going to pass along the recipe my family used when I was growing up.

My mother never got the family recipe from my Ukrainian grandmother.   Instead, she got the recipe from a Polish neighbor, Mrs. Horschak.  It is easy, never fails, and much tastier than any frozen pierogies from the store.  So here is what I believe to be the best recipe for potato and cheese pierogies:

Start by making the filling.
Peel and cook 4 medium potatoes.  Drain water and put potatoes through a ricer.  (Using a ricer rather than mashing your potatoes makes a more uniform filling.)  Stir together with  4 - 6 ounces of grated cheese.  Use any kind of cheese you have a preference for or left in the refrigerator.  The last time I grated a combination of Colby and Monterey Jack and it was quite tasty.  Growing up, Velveeta was tossed into the potatoes.  Add salt and pepper to taste.

Now for the dough.

Take three cups of flour and add 2 beaten eggs.

Mix well with a fork until the eggs are blended thoroughly in the flour.

Add 1 cup of cold water and work the dough until it holds together and is of kneading consistency.

Take 1/2 of the dough and roll on a lightly floured board to about 1/4" thickness.

Cut the rolled out dough with a 2" circle.  (I don't have a 2" cutter, so I usually grab a cup out of the cupboard - it works fine.)

Scoop about a tablespoon of your potato cheese filling in the center of each dough circle.  Work quickly!  Fold the circle in half and prick the outside edges with a fork, both the front and the back to seal the filling inside the dough pocket.

I dust them with a little bit of flour if sticky and set aside while rolling out the other half of  your dough.

Bring a pot of water to a boil.  Add some vegetable oil as this will keep the pierogies from sticking together and add pierogies (I did about six at a time because my pot was small).  Stir while cooking so they don't stick on the bottom of your pan.

When the pierogies come to the top of the water, boil for an additional 2 minutes.  Transfer with a slotted spoon to a strainer.  

That's it!  I prefer to eat my pierogies sauteed in butter and onions and served with a dollop of sour cream. This recipes makes approximately 3 dozen pierogies and takes about 1 1/2 hours from start to finish.

Just try it once and I bet you'll never buy pierogies again!  :)

Monday, March 19, 2012

Springtime Wallhanging


Spring is really here; sunshine, warm breezes and flowers blooming.  It took a really sweet quilting project to get me to go to my sewing room, and this was it.  So I'm wrapping up this little springtime piece and off to Maryland it goes! 

This is a great way to showcase prints you can't part with even though they are small.  Rectangles are  2 1/4" x 3 1/2" unfinished.  Sashing is cut to 2 1/4" wide. 

This is the design mock-up on EQ5.  Rectangles are six rows by ten rows.


Finished and ready to go.

Saturday, March 17, 2012

March 17th, 2012

Rock iris were the first to break through the leaf mulch.

A blanket of snow was no where to be found and the crocus welcomed this with open petals.

I found a few snowdrops hiding by a mound of lavender.

My little garden Gnome is so confused.  Is he really in New York?  Is it really St. Patty's Day?  Is this just a dream?


If anything is possible....I am off to find my rainbow, leprechaun and pot of sewing notions!  Happy St. Patrick's Day!